I will show you how to make home wine from grapes. I’ll show you how I do it every year and the equipment required. I hope that this step by step guide will help you make your own homemade wine from grapes.
I was talking to my friend John today and I told him that I am harvesting grapes from my garden to make my own homemade wine. I started describing the required steps. So at some point, he asks me if it’s worth all the fuss after all.
Aside from the fact that the question “is it worth it” must be inappropriate when talking about our own production from the garden, it was the occasion to do a rough calculation.
This year the cost for tending my small vineyard was about 15 Euros in materials (sulphur and fungicides).
I didn’t have to water it. Grape yards normally the do not need irrigation.
All the vine requires is digging, pruning and tending.
My little vineyard will yield about 150 kilos of homemade wine this year.
The worst commercial wine you can buy, costs about 3 Euros a kilogram. I like to think that my homemade wine will be somewhat better so I rate it at 5 Euros per kilogram.
If I bought the amount of wine I would produce, I would pay between 3*150 to 5*150 or 450 to 750 Euros.
Hmmm… I invested 15 Euros and I will get a product worth 450 to 750 Euros. Not bad… Not bad at all…
This is the second time I will attempt to make my own wine. You can read about last year’s error-filled attempt in the article: Making homemade wine for the first time.
Pay attention to cleanliness and disinfection!!!
All of the following steps to produce your own wine from grapes assume that you use clean / disinfected utensils and tools and that the areas you use are cleaned.
Cleanliness is essential for producing quality wine.
Steps for making homemade wine
The basic steps for making homemade wine are as follows:
- Harvesting the grapes
- Crushing the grapes
- Production of grape must
- Alcoholic fermentation
- Storage and maturation of the wine
We will look each step in detail, later in the article.
Basic equipment you will need for making your own wine from grapes
Before you can make your own wine from grapes you will need some basic equipment.
- Baskets to transfer the harvested grapes
- Utensils or a machine to crush the grapes, break the grape rind and produce grapes puree
- Container to temporarily store the grapes puree
- Mustmeter
- Grape press for extracting the must from the grapes puree
- Container for storing the must
The equipment you will need to buy and use for many years to come, is a mustmeter (is very cheap), a grape press and the containers for storing the must. Next we will look at what these are and how to use them.
Harvesting the grapes
Harvesting the grapes at the right time is one of the most critical steps in the process of making homemade wine.
In Greece, people tell:
“At St. Ilias with a handkerchief, at the Savior’s with a basket.”
“At St. Marina’s fig and at St. Lios’ grape”
“Cicadas spoke, grape’s black berry polished”
It is important to know that if it has previously rained, at least 3 days must pass before you can harvest. This period is necessary to allow the yeasts necessary for the start of alcoholic fermentation to grow again in the grape’s rind.
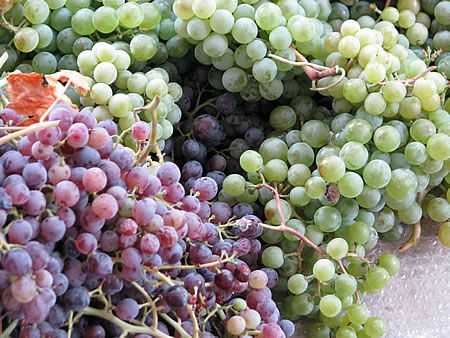
You should choose to harvest the grapes when they are ripe.
Different grape varieties ripen at different times.
Even on the same vine, not all bunches ripen at the same time.
One indicator of ripeness, beyond taste, is wasps, bees and birds beginning to taste the berries.
The bunches that are exposed to the sun ripen faster than the others.
At this point, I should mention that there is no golden rule for the time of harvest, for all grape varieties and for all types of wine we want to make.
Winemaking is both an art and a science and has many parameters. Each region, each variety, each type of wine, has its own requirements.
At www.greekwineland.gr, I found the following indicative harvest dates depending on variety and place:
August
4/8 Santorini varieties (xenololo/athtiri, μαυροτράγανο, βουδόματο, κατσανό, γαïδουριά)
7/8 Chardonnay
8/8 Black currants (Messinia-Ilia)
11/8 Santorini Assyrtiko
14/8 Sauvignon blanc
17/8 Robola (Kefalonia)
18/8 Mandilaria (Santorini)
19/8 Merlot
20/8 Malagousia
21/8 Monemvasia (Paros)
21/8 Liatiko
21/8 Cabernet franc
22/8 Muscat of Alexandria (Lemnos)
22/8 Athiri
22/8 Ugni blanc (trebbiano)
23/8 Aithani
24/8 Syrah
25/8 Assyrtiko (Attica)
26/8 Cabernet sauvignon
September
1/9 Muscat of Rio (Muscovy)
2/9 Assyrtiko (Boeotia)
4/9 Savatiano (Evia)
5/9 Savatiano (Attica)
6/9 Roditis (Attica)
7/9 Mandilaria
8/9 Vilana
10/9 Muscat of Hamburg
12/9 Xinomavro
14/9 Debina
15/9 Kotsifali
15/9 Savatiano (Boeotia)
16/9 Roditis (Boeotia)
18/9 Agiorgitiko (Nemea)
19/9 Roditis (Achaia, Corinthia)
October
2/10 Koliniatiko
7/10 Moscophilero
The riper the grape, the more sugars it contains. The percentage of sugars is a crucial parameter for the wine to be produced because the quality of the wine depends on it, even if it is vinified or not.
The sugars should not be too high but not too low either.
If you have noticed, in the majority of the wine we buy, the alcohol levels are around 12.7. These are the alcohol levels that we should strive for in the wine we produce. 12.7 alcoholic strength corresponds to 12.2 Baume degrees in the must. Baume degrees are measured with an instrument called a mustmeter.
The diagram below shows the evolution of the grape in relation to the quality characteristics of the must.
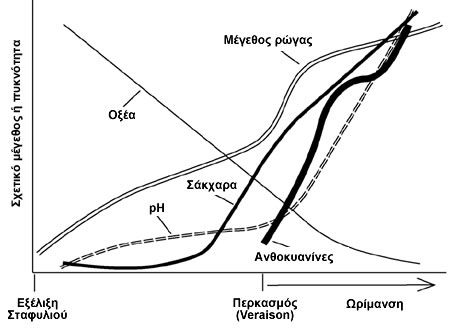
(Diagram from Watson, 2003)
But how do we measure the sugars in the grape must?
There are two basic methods by which we measure the sugar content of the grape must.
Measuring the sugars in the grape must is a very important measurement, because the percentage of sugars corresponds to the alcoholic strength of the resulting wine.
The first method uses a hydrometer called a mustmeter. The hydrometer measures Baume degrees.

A mustmeter costs less than 10 Euros.
The second method uses a refractometer. Although most refractometers measure in Brix degrees, there are others that measure in both the Brix and Baume scales.

Optical and electronic refractometers are available on the market. Optical ones cost about 50 Euros. The electronic ones cost about 300 Euros.
The advantage of the refractometer over the mustmeter is that in order to take a measurement you will need the juice of just one grape berry.
In contrast, in order to obtain a measurement with a mustmeter, we would need to extract the juice from enough grape berries to fill a testing cube into which we would dip the mustmeter.
The choice of the instrument you’ll use is yours. I personally use a mustmeter.
The Baume scale is the most popular, because it gives in approximation the alcoholic degrees.
To convert Baume degrees to Brix degrees, multiply by 1.8. E.g. 12 Baume degrees correspond to 21.6 (12*1.8) Brix degrees.
To convert Brix degrees to Baume degrees, divide by 1.8. E.g. 25 Brix degrees correspond to 13.89 (25/1.8) Baume degrees.
Correction of Brix or Baume measurement
Both instruments are calibrated for a specific temperature, e.g. 15 or 20 degrees Celsius. (Any good instrument will indicate the calibration temperature). Because the ambient temperature will probably be different from the calibration temperature, you will need to make a correction to the measurement to scale it to the actual temperature.
For each degree Celsius above the calibration temperature, add 0.05 to the measured value.
For each degree Celsius below the calibration temperature, subtract 0.05 from the measured value.
Example:
We use a mustmeter calibrated to 15 degrees Celsius.
We measure a must at a temperature of 27 degrees Celsius.
The mustmeter shows us that the must is 12 degrees Baume.
The actual Baume degrees of the must is: 12 + (27-15)*0.05 = 12.6 Baume degrees.
How to increase or decrease the Baume degrees of the must
Sometimes, despite our best efforts, the must we produce does not have the required Baume grades. It is usually lower than 12 Baume degrees and rarely higher.
In these cases we can intervene and correct the Baume levels.
To raise 1 Baume degree of 100 liters of must, we need to add 2 kg of common granulated sugar.
The exact ratio is 18 grams of sugar per 1 liter of must.
But we don’t just pour the sugar into the must and stir… There is a procedure we should follow.
We get some must. We put it in a pot and place the top on a stove (electric kitchen) to raise its temperature, but not boil it. Pour the sugar into the heated must. Stir until the sugar dissolves (it happens quickly). Remove from heat and allow to come to room temperature. Then add this liquid to the must and stir well.
You should be aware however, that according to Greek law, the addition of sugar degrades the quality of the wine and is prohibited in Greece for wines intended for commercial use (Panagiotis Tsetouras. The secrets of good wine).
In France however, legislation allows the addition of granulated sugar and tartaric acid to wine. But it does not allow the simultaneous addition of both.
Either way, the addition of sugar is best used for micro-corrections of Baume degrees. E.g. from 12 degrees Baume to 12.5 degrees Baume.
To reduce by 1 degree Baume 100 liters of must, add 8 kg of water (for the range 12.5 to 13.5 degrees Baume). The water used should be chlorine-free (bottled).
Other measurements of the characteristics of the must
In addition to the measurement of the Baume degree of the must, there are a number of other measurements made on the must. These are:
- ACIDITY. A measurement which relates to the acidity of the wine (tartaric acid, citric acid, etc.). It usually ranges from 5.0 to 6.0 in white wines and 4.5 to 5.5 in red wines.
- SULFITES. A measurement showing how much sulphite (sodium metabisulfite) the wine contains. There are two kinds of measurements: Free Sulfite, which is what protects us (from oxygen and microorganisms) and Total Sulfite (which shows how much Sulfite has been added to the wine overall). Have you noticed that the wines we buy have a label that says “Contains Sulfites”? It refers to the sodium metabisulfite that has been added to the wine.
- TITRATABLE ACIDITY (TA). One of the most basic measurements. It shows the health and strength of the wine. It allows us to know (indirectly) how many “bad” microorganisms it contains. These microorganisms aim to turn our wine into a beautiful vinegar, after destroying its aroma, taste and color. The smaller the measurement the better. The ideal range for white wines is 0.20-0.30, and for red wines 0.30-0.60. After 1.00 the deterioration is noticeable by most consumers. The volatile for in no way makes the wine dangerous to drink, it only alters the organoleptic characteristics.
- IRON. A measurement relating to the iron contained in wine. It is advisable to be below 3.
- SPECIAL WEIGHT. This measurement is used to check whether fermentation has been completed, i.e. whether all the sugars have been converted into alcohol and the must is now wine.
Pressing of the grapes – crushing of the rinds
You have already harvested the ripe grapes and removed the problematic berries. The problematic grape berries are those that are wounded, have begun to rot, have been damaged by birds or wasps. It is important to remove the problematic berries because if you leave them, they will negatively affect the quality of the wine.
The purpose of the berries breaking process is to release the juice from the grape berry.
Crushing can be done in two ways.
By pressing the grapes with the feet. This is the simplest and most traditional method, especially in older days. You put the whole bunches of grapes in a container (from a simple plastic bowl to a special construction) and press them with your feet. The feet should be clean!

Using a special machine called a grape crusher. There are different grades of grape crushers. Cheap and expensive ones. There are manual and electric grape crushers. There are grape crushers that separate the stems from the berries and others that don’t. Whether you choose a cheap or expensive grape crusher, make sure it is made up of stainless steel parts. If the grape crusher rusts and the rust gets into the must, you’re in big trouble.

At the end of this phase you have the mashed grape bunches, i.e. the grape puree, ready for the next stage.

The grape puree must be stripped of its grape stems (shoots, rachis, peduncle and pedicels). The presence of these has a negative impact on the quality of the wine and on the health of the consumer.
What you do next with the grape puree depends on the type of wine you want to make: White, Pink or Red.
White vinification
If you want to make white wine (white vinification), you must proceed directly to pressing the grape puree and extracting the must.
You put the grape puree into a grape press and extract the must.
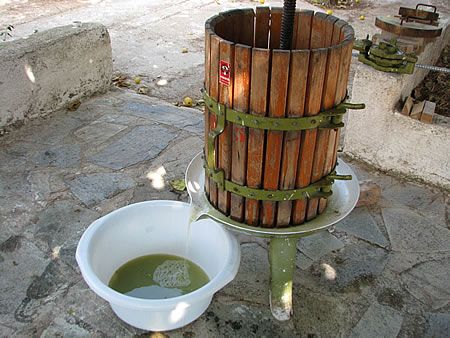
Grape press
On the market you will find manual and mechanical grape presses. I will refer to the manual ones because they are aimed at home producers. Their prices (between 100 and 500 Euros) are determined by their capacity and quality.
You then place the extracted must in a clean container. We place the must temporarily, usually in a stainless steel or plastic container. The must will remain here for 12 to 14 hours to settle the particles in suspension. The particles will appear at the bottom in the form of “mud”.
The must is then transferred to the vessel where the next important phase will take place. The alcoholic fermentation.
This container can be a wooden barrel, plastic barrel or stainless steel container. In all cases. the container must be open to allow the must to aerate and the carbon dioxide produced during alcoholic fermentation to escape. The opening of the container should be covered by a thin fabric to prevent insects or dirt from entering, but allowing carbon dioxide to escape.
This protection can be provided by a thin fabric or tulle.
The container should be located in a ventilated area. Otherwise, there is a serious danger of carbon dioxide poisoning when you enter this badly ventilated room.
An important parameter is the temperature at which the must is kept during the alcoholic fermentation phase. For white wines, it should be around 18 degrees Celsius.
This way the fermentation process lasts longer and therefore the more fermentation aromas the white wine will get.
As most of us do not have underground cellars with low temperatures, keeping the temperature at these low levels is usually done by artificial means. Some use ice columns to keep the temperature low.
Once alcoholic fermentation is complete, we have two options.
We can either transfer the wine to another container where it will be stored or leave it in the same container.
In both cases, the container must be sealed to prevent the wine from coming into contact with air and oxygen.
Wooden barrels are closed with plaster.
In open-top stainless steel containers, place the special floating lid on the wine so that it floats and then fill the void with paraffin oil.
Typically, the grapes wine is ready for consumption after a few days. But if you let it age for a month it will be even better.
You should be aware that white wines don’t last long and should be consumed soon. Otherwise they get a bad taste.
Red or rosé vinification
If you want to make rosé or red wine (red vinification), you should first keep the grape puree you have made (always without the stems) for 2 to 18 days.
The longer the grape rinds are kept with the must, the redder the wine will become.
Depending on how long you keep the grape rinds with the must, it will depend on whether or not alcoholic fermentation takes place within the grape must.
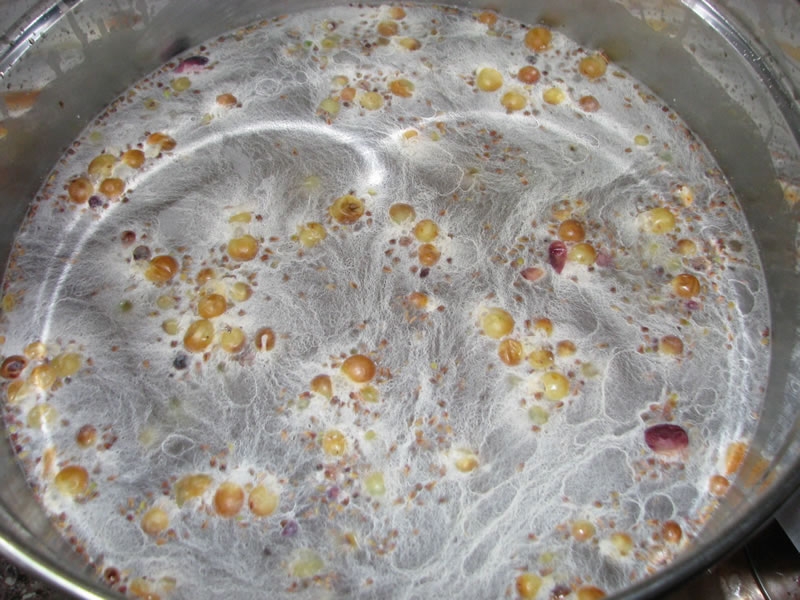
As carbon dioxide is released during alcoholic fermentation, the grapes rise to the surface, creating the so-called “cap”.
The red pigments (anthocyanins), which give wine its red color, are found in the rinds, as are tannins, which have a decisive influence on its taste, structure and texture.
In order to get as many of these substances as possible into the juice, the mixture should be stirred regularly so that the grape rinds are in frequent contact with the must, even with the must at the bottom of the container.
This process is called “extraction”. During “extraction”, the desirable substances pass into the wine, which is colored red and acquires the desired taste, structure and texture. The “extraction” process lasts from a few days to several weeks for red wines and about 12 to 24 hours for rosé wines.
The container in which to place the must can be a wooden barrel, plastic barrel or stainless steel container. In all cases. the container must be open to allow the juice to aerate and the carbon dioxide produced during fermentation to escape. The opening of the container should be covered by a thin fabric to prevent insects or dirt from entering, but allowing carbon dioxide to escape.
This protection can be provided by a thin fabric or tulle.
Even if you have used a stainless steel container, you can simulate the characteristic aroma of wines in oak barrels by using oak additives. The oak additives are placed in the must with the help of a separator (e.g. tulle, tights). The dosage of their use is from 1 to 4 grams per liter of wine. They can be added both during the fermentation phase (color stabilization) and during the maturation phase (aroma production).
They are placed in the juice for 2 to 5 weeks and then removed.
The container must be located in a ventilated area.
An important parameter is the temperature at which the must is kept during the alcoholic fermentation phase. For red wines, the ideal temperature is between 25 and 28 degrees Celsius. At this temperature it is possible to obtain the components that adequately differentiate the flavor, structure and texture of red wines, while maintaining the freshness of their aromas.
After extraction, the must is separated from the grape stems (shoots, rachis, peduncle and pedicels) and we place it in another container to continue fermentation. The grapes are then either crushed in the grape press to obtain the must they contain (which is added to the existing must), or they are taken to a secial distiller for distillation and production of tsipouro or raki. In red wines we usually also pursue malolactic fermentation, which we will see below.
Once alcoholic fermentation is complete, we have two options.
We can either transfer the wine to another container where it will be stored or leave it in the same container.
In both cases, the container must be sealed to prevent the wine from coming into contact with air and oxygen.
Wooden barrels are closed with plaster.
In open-top stainless steel containers, place the floating lid on the wine so that it floats and then fill the void with paraffin oil.
In red wines, we make sure the wooden barrel we use is made of oak.
Alcoholic fermentation
If we want to make a white wine, we place the must in a clean container. This container can be a wooden barrel, a plastic barrel or a stainless steel container. In all cases, the container must be open so that the juice can be aerated and the carbon dioxide produced during fermentation can escape. The opening of the container should be covered to prevent insects or dirt from entering.
This protection can be provided by a thin cloth or tulle.
The container should be located in a ventilated area.
The ideal temperature of the room depends on the type of wine being made.
For white wines, it should be around 18 degrees Celsius. This way the fermentation process takes longer and therefore the more fermentation aromas the white wine will get.
As most of us do not have underground cellars with low temperatures, keeping the temperature at these low levels is usually done by artificial means.
For red wines, the ideal temperature is between 25 and 28 degrees Celsius. At this temperature, it is possible to obtain the components that appropriately differentiate the flavor, structure and texture of red wines, while maintaining the freshness of their aromas.
The alcohol contained in the wine is produced from the sugars in the must – mainly glucose and fructose – by the alcoholic fermentation reaction carried out by special enzymes of the yeasts found naturally on grapes rind. The most efficient fungi belong to the genus Saccharomyces, but species of the genera Pichia, Kloeckera and Torulopsis are also actively involved in the process. The winemaker, unlike the brewer, does not need to inoculate the must with cultivated yeasts.
The yeasts are already inactivated in the grape rinds before harvesting and are activated during vinification. They come into contact with the must, where they multiply and carry out fermentation, during which, in addition to ethyl alcohol, carbon dioxide and heat are produced, which is why the must is hot and “boils” during fermentation.
The fermentation process lasts from 8-9 to 25 days, depending on the initial concentration of sugars, the temperature at which the fungi multiply and act, the oxygen available to them and other factors.
We monitor the fermentation process by monitoring the sugar content of the must.
We use a mustmeter to measure this. We measure the sugar content every day.
When the sugar value becomes zero, all the sugars have been converted into alcohol. If we want to produce sweet wine, we must stop fermentation before the sugars in the must are exhausted (see below).
The longer the fermentation takes, the more fermentation aromas the wine will take on, which is why, especially for white wines, most winemakers use artificial means to keep the fermentation temperature low, reducing its speed.
In red wines, fermentation often takes place in two phases.
A first, vigorous and fast, during which the grape rinds are also present in the must, and a second, slower one, after the removal of the rinds.
Fermentation may be interrupted before completion by heating (>38-40 °C), by cooling (<6-7 °C) or by adding a small quantity of pure alcohol. If the fermentation is interrupted, a percentage of the sugars remain unbroken, so the method is used in the production of sweet wines. Like expensive Santorini’s sweet wines.
Malolactic fermentation
In addition to alcoholic fermentation, another type of fermentation, malolactic fermentation, often takes place in parallel in the must. During this reaction one of the organic acids in the grape, malic acid, is converted into lactic acid. This is important because lactic acid is less acidic than malic acid, so malolactic fermentation reduces the acidity of the wine. This is mainly what we seek in red wines, while in white wines acidity is usually desired to a greater degree.
Storage and ageing of the wine
You should be aware that homemade wine made without the addition of chemicals and preservatives will be much more delicate than commercial wine. It should therefore be consumed sooner so that it does not age and die (wine is a living organism).
Wine is a living organism. It does not have an unlimited life span. It goes through phases of “youth” and “prime maturity” until it finally “ages” and “dies”, i.e. the period in which it can be consumed comes to an end.
What we generally aim for is that the wine does not oxidize. This is why we seal the barrels or use open-top stainless steel containers with paraffin oil, which isolates the wine from the atmospheric air and thus oxygen.
Epilogue
This article does not hope to teach you all the secrets of winemaking from grapes. I would love to had all that knowledge, but I simply don’t have it. I am learning, researching, experimenting, correcting my mistakes and moving on, each year.
This article hopes to help those who are thinking about starting to make their own homemade wine, and are looking to find basic information on what to do and where to start.
Winemaking from grapes is both an art and a science. It is up to you if you choose to embark on the journey of home wine making from grapes!
Sources
www.greekwineland.gr/content/view/287/107/
A Review on Stems Composition and Their Impact on Wine Quality
Tags: CULTIVATE • DIY • GRAPES • HOMEMADE WINE • MAKE WINE • VINEYARD • WINE MAKING