Today I will share with a method to save tomato seeds for next year. I learned this method from a local elder producer of Santorini’s tomatoes in Santorini, Greece.
I use this method every year to save tomato seeds for the next year planting.
One of the secrets to save strong and healthy tomato seeds is to get them from the first tomatoes the plants will produce. The old-timers say that in every plant, the first fruits are the ones that have the best characteristics and that’s where we should collect seeds from.
So, while the tomatoes are still on the tomato plant, I mark the ones I choose for seed keeping to distinguish them from all the others.
I don’t cut the selected tomatoes from the tomato plants until they are quite ripe. I make sure not to select only the largest or most well-formed ones. In this way, I want to maintain a variety.
Step 1 – Remove the tomato seeds
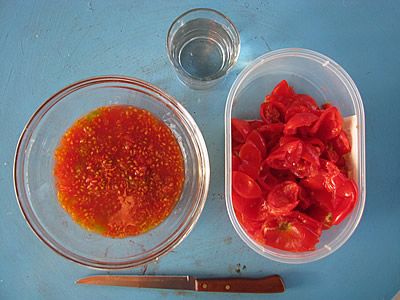
I cut the tomatoes in half and squeeze out the fleshy pulp containing the seeds into a glass jar or bowl. Repeat until you have a good quantity of fleshy tomato pulp full with seeds.
Step 2 – Add water to the tomato pulp
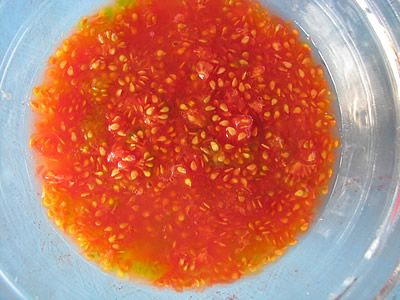
Add half a glass of water into the pulp and stir well to make sure that water goes everywhere. The amount of water you’ll add depends on the volume of the tomato pulp.
Step 3 – Cover and store
I cover the glass jar or bowl with a clear packing film so it doesn’t come into contact with the air.
I place the glass jar or bowl in a shady and cool place. I leave it to rest for 3 to 5 days.
Step 4 – Scum of mould develops on the surface
After 3 to 5 days, the appearance of the mixture will be very different.
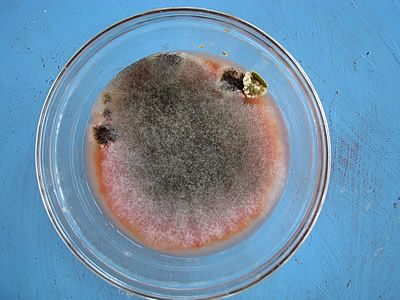
Scum of mould will grow on the surface of the mixture. Do not be alarmed. It is part of the process. We are on the right track.
This mould is produced by the gel that surrounded tomato seeds and is now fermenting. This gel inhibits germination and we want to get rid of it.
Step 5 – Remove the mould and rinse
I remove the surface mould and dilute the contents of the bowl with plenty of fresh water. I change water very so not to lose any seeds. I Repeat as many times as necessary until the tomato seeds are clean.

I then use a strainer to remove the water completely and keep only the seeds. I rinse the seeds over and over again by pouring water through the strainer.
Step 6 – Drying the tomato seeds
I spread the seeds on a plate (plastic or porcelain) and put them to dry thoroughly in a place that is warm and out of the sun for several days.
To prevent your seeds from becoming bird food, you can cover the dish with a piece of tulle.
Leave the seeds for a few days to dry completely. Once a day I mix them to change their position.
You should remove all the moisture from the tomato seeds before storing them.
Step 7 – Store the tomato seeds
I store the seeds in airtight glass jars. Good ones are the ones that housewives use to store spoon sweets. You can find them in supermarkets or specialized stores. The small size we need, costs less than 3 Euros.
I place the glass jar in a dark place without too much humidity until the next year when I am read to sow new tomato plants.
I hope you’ll find useful this tested and trusted method of saving tomato seeds.
Tags: DIY • I MAKE • SANTORINI ISLAND • SANTORINI TOMATOES • SEEDS • TOMATO • TOMATOES